Pumpkinator: Light and Sound Shows
The Pumpkinator's candle flicker, light shows, and sound effects all come from two places: the code running on the Arduino Nano, and the MP3 files stored on the sound card. This page shows how to load both, which is also how you would change the shows or swap in your own sounds.
These steps have only been tested on a Windows laptop. They may work on a Mac or Linux computer, but we haven't tried. The sound loading tools in particular (a Windows PowerShell script and MusicDownload.exe) are Windows programs.
You will need a micro USB cable that can carry data (not just charge). The Arduino Nano and the sound card both use the same kind of cable.
How to update the code on the Arduino
1. Install the Arduino IDE
The Arduino IDE is the free program used to write code and send it to the Arduino. Download the Arduino IDE and install it with the default options.
2. Connect the Arduino to your laptop
Plug the micro USB cable into the Arduino Nano, and plug the other end into your laptop. A small power light on the Nano should come on.
As a precaution, keep the battery switch turned off while the USB cable is plugged in.
3. Make sure Windows can see the Arduino
Most Arduino Nano boards, including the ones in our kits, use a chip called a CH340 to talk to the computer. Windows needs to recognize it and give it a COM port (a name like COM3) before the Arduino IDE can talk to the board.
To check, right-click the Start button, choose Device Manager, and expand Ports (COM & LPT). You should see something like USB-SERIAL CH340 (COM3). Unplug the Arduino and plug it back in to see the entry disappear and reappear.
If no COM port shows up, work through these in order:
- Try a different USB cable. Many micro USB cables are charge-only and have no data wires. This is the most common cause.
- Try a different USB port on the laptop, preferably one directly on the laptop and not on a hub or dock.
- Look for a warning in Device Manager. Under Other devices, or in the Ports list, look for an unknown device or a CH340 entry with a yellow warning icon. That means Windows doesn't have the driver. Install the CH340 driver using the SparkFun CH340 driver guide, or download it directly from the WCH driver page (the maker of the chip). Run the installer, then unplug the Arduino and plug it back in.
- Restart the Arduino IDE after plugging the board in. The port list sometimes doesn't refresh on its own.
- Check for a power light on the Nano. If there's no light at all, the cable or the board has a problem. Try a different cable first.
4. Choose the port in the Arduino IDE
In the Arduino IDE, open the Tools menu, then Port, and choose the COM port that you saw in Device Manager (for example COM3). If you're not sure which one is the Arduino, open the menu, unplug the Arduino, and open the menu again: the port that disappeared is the right one.
5. Choose the type of Arduino
Open Tools, then Board, then Arduino AVR Boards, and choose Arduino Nano.
If you don't see Arduino AVR Boards in the list, open Tools, Board, Boards Manager, search for "Arduino AVR Boards", and install it.
6. Choose the processor (old bootloader)
Open Tools, then Processor, and choose ATmega328P (Old Bootloader).
Most Nano clones need the old bootloader setting. If the upload fails later with an error like programmer is not responding or not in sync, come back to this menu and try the other option, ATmega328P. Also double check that the port from step 4 is still selected.
7. Get the Pumpkinator code
The Pumpkinator code lives in the team's GitHub project, github.com/Fahrenheit6882/pumpkin. Download it to your laptop by clicking the green Code button and choosing Download ZIP (then unzip it), or by cloning it with git if you're familiar with that.
In the Arduino IDE, choose File, then Open, and open the file pumpkin/pumpkin.ino from inside the folder you just downloaded. This is the code for the full Pumpkinator.
8. Install the libraries the code needs
The code uses two libraries that don't come with the Arduino IDE. It won't compile until both are installed.
Open Sketch, then Include Library, then Manage Libraries. A panel opens on the left.
- FastLED: search for
FastLEDand click Install on the one by Daniel Garcia. This is what controls the WS2812B LEDs. - JQ6500_Serial: search for
JQ6500and install it if it appears. This is what sends play commands to the sound card. If it doesn't appear in the list, download it from the JQ6500_Serial GitHub page (Code, then Download ZIP). Then in the Arduino IDE choose Sketch, Include Library, Add .ZIP Library, and pick the ZIP file you downloaded.
To check that everything is installed, click the Verify button (the checkmark at the top left of the Arduino IDE). It compiles the code without sending it. If you see an error like FastLED.h: No such file or directory or JQ6500_Serial.h: No such file or directory, that library isn't installed yet.
9. Upload the code to the Arduino
Click the Upload button (the right-pointing arrow next to Verify). The Arduino IDE compiles the code, then sends it to the Arduino. The little lights on the Nano flash while it uploads. When it finishes, the bottom of the window says Done uploading.
After a few seconds, if the LEDs are connected, they should flicker like a candle. If the upload works but the lights don't behave right while the Arduino IDE is open, unplug the USB cable, close the Arduino IDE, and plug the cable back in.
If the upload fails:
| Error or symptom | What to try |
|---|---|
programmer is not responding or not in sync | Try the other Processor option (step 6), double check the Port (step 4), and try a different USB cable. Also make sure nothing, such as a stray wire, is connected to the Nano's RST pin |
| Port list is empty, or the port is grayed out | Go back to step 3: cable, USB port, and CH340 driver |
Access denied or the port is busy | Close anything else that might be using the port, such as another Arduino IDE window or a serial monitor, then unplug and replug the Arduino |
No such file or directory mentioning a .h file | A library is missing. Go back to step 8 |
How to load MP3s onto the sound card
The sound card stores the sound effects itself, and the Arduino tells it which one to play. The sound files live in the same team GitHub project as the code, in the sounds folder, as 10 numbered MP3s (001_disco.mp3, 002_crazy_clown_laugh.mp3, and so on).
Kits come with one of two sound cards, and they load sounds differently:
- HW-896V2.0.2: connect it, run a copy script, eject it.
- True JQ6500: connect it, run
MusicDownload.exe, eject it.
Not sure which one you have? Step 3 shows how to tell.
1. Get the Pumpkinator project
You'll need the Pumpkinator project, because it contains the MP3s that match the pumpkin.ino code you loaded above. If you haven't already, download it from github.com/Fahrenheit6882/pumpkin (Code, then Download ZIP, then unzip it), as described in step 7 above.
2. Connect the sound card to your laptop
Plug a micro USB cable into the sound card, and plug the other end into your laptop. Make sure the Arduino isn't also plugged into the same laptop, so there's no confusion about which device is which.
A new drive should appear in Windows. Open File Explorer, choose This PC, and look for a new drive, shown as something like USB Drive (D:). On our laptop it appears as D:, but the letter may be different on yours. Make a note of the letter.
If no new drive appears:
- Try a different USB cable. As with the Arduino, charge-only cables are the most common cause.
- Try a different USB port on the laptop.
- Unplug the cable, wait a few seconds, and plug it back in.
3. Which sound card do you have?
Some kits come with an HW-896V2.0.2 sound card, and some come with a true JQ6500. (The HW-896V2.0.2 is a clone of the JQ6500, so the two look almost identical and play sounds the same way.)
You can look for the model name printed on the chip, but the letters are tiny and really hard to read. It's usually easier to check how the card behaves. With the card plugged in, open its drive in File Explorer:
- If you see a
MusicDownload.exeprogram, it's a true JQ6500. - If the drive is empty, or it contains some MP3 files, it's an HW-896V2.0.2.
Then follow the matching section in step 4.
4. Load the sounds onto the sound card
The sound card plays files in the order they were written to it, not in alphabetical order. The code expects track 1 to be the disco sound, track 2 to be the clown laugh, and so on. So the files must be loaded one at a time, in number order, and leftover files from an earlier load would keep their old position. Both methods below take care of this.
HW-896V2.0.2: copy script
The drive is right there, so it's tempting, but dragging files over won't put them in the right order. Use the script.
Step 1: Run the script to copy the sounds in order.
The project includes a script that copies the MP3s onto the sound card in the right order. It also deletes any old MP3 or WAV files already on the card first, because leftover files would keep their old position in the play order.
-
Open PowerShell in the project folder. In File Explorer, open the downloaded
pumpkinproject folder, click the address bar, typepowershell, and press Enter. -
Run this command, replacing
D:with the drive letter you noted when you connected the sound card:.\scripts\copy-sounds-in-order.ps1 -Destination D: -
The script lists the files in playback order and then prints
Copied ...for each one. When it finishes it printsDone. Copied 10 file(s).
The script also reads pumpkin/pumpkin.ino and checks that the number of MP3s matches the number of entries in its TRACK_DURATIONS list. If they differ, it prints a warning (the copy still goes ahead). That means the code and the sounds are out of sync: fix TRACK_DURATIONS and upload the code again (see Using your own sounds).
If PowerShell refuses to run the script with a message about scripts being disabled, run this version instead, which allows the script to run just this once:
powershell -ExecutionPolicy Bypass -File .\scripts\copy-sounds-in-order.ps1 -Destination D:
To preview what the script would do without copying or deleting anything, add -WhatIf to the end of the command.
Step 2: Unplug the sound card safely.
In File Explorer, right-click the sound card drive and choose Eject, then unplug the USB cable. The sounds are now stored on the sound card, and it will keep them even with no power.
True JQ6500: MusicDownload.exe
The true JQ6500 doesn't work with the copy script. Instead, use its own loader program, MusicDownload.exe.
Step 1: Load the MP3s with MusicDownload.exe.
-
Run
MusicDownload.exefrom the sound card's drive.The app is sometimes in Chinese, which can be confusing. If you see
????where the labels should be, don't worry. You can still do everything by following the position of the tabs and buttons below. -
Click the second tab (it shows
????), then click the button with Chinese text on it. A file picker opens. Go to thesoundsfolder of the Pumpkinator project, choose all 10 MP3s, and click OK. Make sure the files end up in number order (001_disco.mp3first, then002_..., and so on). The order you load them in is the track order, so a wrong order means the wrong sounds play.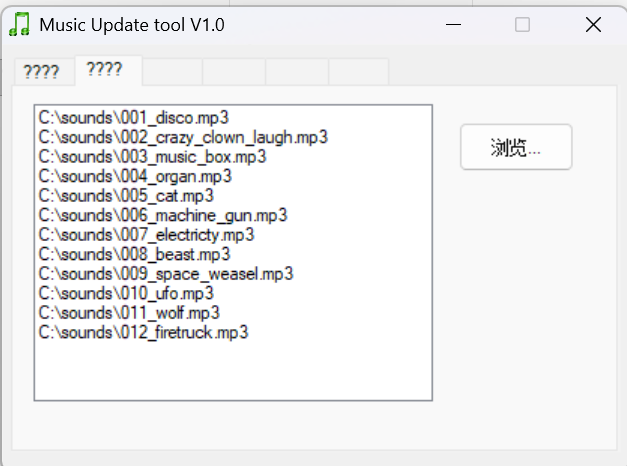
-
Click the first tab (also
????), then click the large button with Chinese text on it to upload the files to the sound card.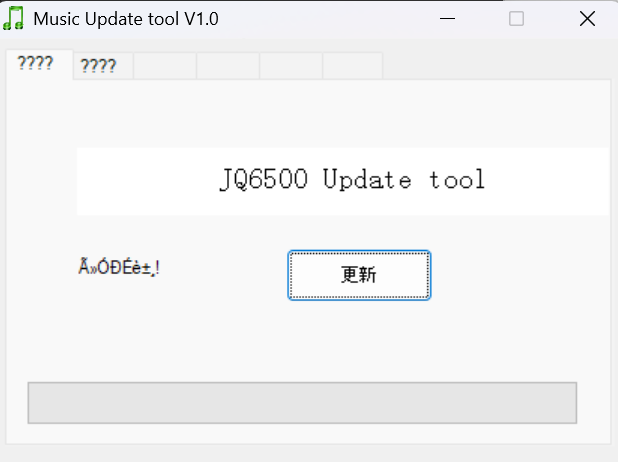
-
Wait a while. It's confusing because the status text is in Chinese too, but if you look closely at the status area, it will say done followed by some strange characters when the upload has finished. Don't unplug the card before then.
If you're reloading a sound card that already has sounds, make sure the old ones are cleared out or replaced, so leftover files don't shift the track order.
If your card doesn't have MusicDownload.exe on it: the loader is no longer stored in the Pumpkinator project, so download it instead:
- A zip with a loader for each flash size (8, 16, 32, 64 and 128 MBit): JQ6500.voice.chip.module.zip, shared in JQ6500_Serial issue #6.
- English-language versions of the loader, from the same issue, on Google Drive.
- On Linux, try the JQ6500-rescue-tool.
Pick the version that matches the flash size of your module. The size is printed on the flash chip on the underside of the board: for example, 25X16 means 16 MBit.
Step 2: Unplug the sound card safely.
In File Explorer, right-click the sound card drive and choose Eject, then unplug the USB cable. The sounds are now stored on the sound card, and it will keep them even with no power.
Which light show goes with which sound
The tracks play one after another in order, and wrap back to the first after the last one. Each track has its own light show:
| # | Sound | Light show |
|---|---|---|
| 1 | 001_disco | Random colors |
| 2 | 002_crazy_clown_laugh | White strobe |
| 3 | 003_music_box | Red, blue, yellow, green |
| 4 | 004_organ | Solid blue |
| 5 | 005_cat | White strobe (the default) |
| 6 | 006_electricty | Purple blinks, then white |
| 7 | 007_beast | Solid green |
| 8 | 008_space_weasel | Purple and yellow alternating |
| 9 | 009_ufo | White strobe (the default) |
| 10 | 010_wolf | Solid red |
Any track without its own light show uses the white strobe.
Using your own sounds
- Put your MP3 files in the
soundsfolder with number prefixes (001_...,002_...) in the order you want them played. - Edit
TRACK_DURATIONSnear the top ofpumpkin/pumpkin.ino. It needs one length in milliseconds per track, in the same order as the files.TRACK_COUNTis worked out from this list automatically, so you don't need to change it. A missing or extra entry makes the code read past the end of the list and get stuck, so keep the list and the files in sync. - Update the
state == Nchecks in theloop()function so each light show follows the right track. - Upload the code again using the steps above, and load the sounds onto the sound card again using step 4.
Stuck flashing white and silent? The number of entries in TRACK_DURATIONS doesn't match the number of MP3s on the sound card. Fix whichever is wrong, then upload the code and reload the sounds.